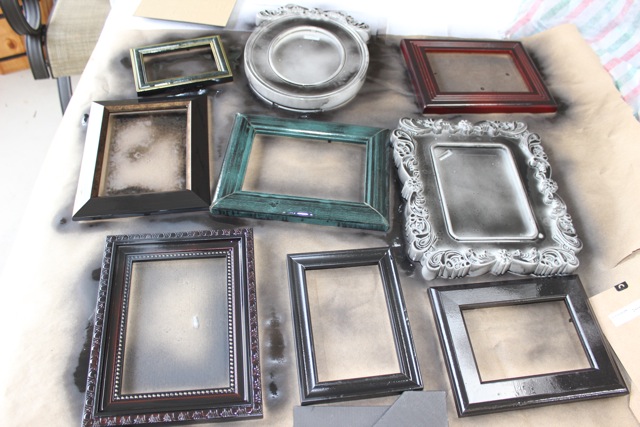
I love ombre. Obsessed. My hair is even ombre… red on top and blonde on bottom so it is fitting that I make a DIY Ombre home project for my blog. I found a pile of picture frames at Salvation army and grabbed 2 awesome frames from Ikea to pull the whole thing together. Total cost of this project was 16$. The Ikea frames were 10$ and the salvation army frames were 6$. This project was really easy to do! It took a little time because there were so many frames to paint but it was SO WORTH IT! This is a great project if you have frames with the glass missing. Just paint, add a paper spring clip and voila, interchangeable frame!
So here is how I did it..
** Tip: When buying frames (especially from the thrift store) make sure they have hangers on the back. If they donãt you will need to add wire or some other really annoying time consuming thing, so just buy ones with hangers Þ
Materials:
- Frames
- Primer
- Paint
- Paper Spring Clips
- Hot Glue
1. Lay out your frames to figure out how you want them arranged on the wall.
2. Take the backs off and throw the glass away (or upcycle into a different project! pressed flowers?)
3. Spray primer on all of the frames. I used BLACK primer because I wanted to make these frames shabby chic, antiqued and that requires a dark base. If you want a clean paint job then I suggest you use white primer. I like the auto primer because it adheres well to plastics and the ikea frames are very hard to paint properly so you NEED PRIMER. Every crafter should have primer and an overcoat finishing spray at all times. Just sayin. If you want to try to paint frames without primer be my guest but just be ready for chipping. Or you can spray on a TON of final coating spray on when you are finished if you have no primer.
First coat… notice the older wood frames sucked it up fast. The plastic Ikea frames and the painted wood frames were a little slower to adhere. Second coat is needed for sure.
4. Hot glue the paper spring clips onto the frame backings. ** Make sure you glue them following the correct orientation. In other words, if your final collage has a frame that is vertical make sure the clip is glued to the top vertically. I was working on 3 projects at once and just started gluing without thinking. I had to change my whole collage order to fix it Þ
5. Mix the ombre paint colors. ** Make sure to mix EXTRA. It is way better to have left over you have to throw away then to make more. Trust me you will NEVER get an exact color match.
I used Behr Deep Breath Blue from Home Depot. Sample size $3
I mixed it with a cream paint I already had. Although it is not pictured I actually made twice this amount of paint, I kept pouring more and more until it was 3/4 full…. Im so glad I did. I used it all.
6. Paint your frames, backings and clips.
7. This is optional but I like to antique most of the things that go in my house. Thatãs just how I roll. You will see if you follow my tutorials regularly that i love to use nail files to roughen edges on projects both big and small. I find it works better then actual sanding pad. Easier to hit exact areas and details.
So that is everything painted.. phew! Doesnãt it look gorgeous? So far so good.
8. Finish it off with a little clear finish spray. I use this stuff on everything. I know it sayãs it is for wood but I will just assume that means everything…. Þ Seems to work pretty good so far.
9. That is it. All done! Now all you have to do is put the pictures into the clips and hang on your wall. I round the edges of all of my pictures to make them look nice since they are just hanging loosely. I use this corner rounder from amazon for $8.39


Link Parties by Date (Sun-Sat): Bewitch Me TitiCrafty | Nifty Thrifty Sunday | Sunday Showcase By Stephanie Lynn |Think Pink Sunday |Link It Or Lump It |The Block Party | Mega Inspiration Monday | Monday Funday | The DIYERS | Making Monday | Craftastic Monday| Much Ado About Monday |Twirl And Take A Bow |Tip Me Tuesday | Hit Me With Your Best Shot | Work it Wednesdays | Wednesday Whatsits | Wow Me Wednesday | The Inspiration Exchange | Wildly Original Link Party| Thursday S.T.Y.L.E |Weekly Kids Co-op | The Party Bunch | Craft Frenzy Friday | Link Party Palooza | Pin Me Party |Live. Love. Create. | Spotlight Saturday |Serenity Saturday For a complete link party list by date visit my link party page


These are SO pretty! I love ombre! What a great way to use old frames. I have a bunch of ugly black ones dying to be painted Þ
Thanks Angela, glad you like them!
These turned out really great!! I love ombre as well, Iãve even done a couple projects “ombre style”. I love getting frames from the thrift store to “upcycle” them!! Plus those 2 Ikea frames are great, Iãve been wanting to get them.
Thanks Courtney, so glad you like how they turned out!
Love these!! I am/was obsessed with Ombrûˋ, too! My hair lady tried hard to convince me to do the ombrûˋ hair thing, but I was just too wimpy. In also live how you use black primer under your stuff. Never would of thought if that on my own :-).
Haha Katie, once I went ombre I never went back! Easy upkeep Þ
they turned out so great. I love ombre too!
Thank you Bette!
Wow! This is such a great idea, Sonnet!
Alexis @ Persia Lou recently posted…Help Me Pick a New Rug!
Glad you like it, thanks for stopping by!
Ooh I LOVE the ombre look! So beautiful, Sonnet! Sharing for sure! Have a great week!
~Abby =)
Abby @ Just a Girl and Her Blog recently posted…Valentineãs Day Gift Guide 2014 {40+ Awesome Gift Ideas!}
Thanks Abby, you too!!
Aah I wish I had the guts to ombre my hair!
This is really pretty Sonnet, and I think the nail file brought the perfect touch.
Amy @ Homey Oh My! recently posted…Decorating a Planner Cover
Thanks Amy! I discovered the nail file one day when I didnãt have a sander and now I use it for everything!
This is an amazing idea Sonnet! Love it - pinning and sharing it on my FB page.
Krista @ the happy housie recently posted…Work it Wednesday {and features!}
Yay, so glad you like them Krista. Thanks so much for sharing, you are the BEST!
I love ombre. These are great!
Thank you Chelsea!
This project turned out so great! And really great tip with the black automobile primer! Þ
Megan @ Two Live Colorfully recently posted…minimalist-lite | 30-piece wardrobe
Thank you so much Megan!! Iãm so glad you like it
These are beautiful! Pinning to make a set of my own. I have a ton of very unattractive frames that could use a makeover. I love the vintage look of them!
Candace recently posted…Breakthrough
Thank you so much Candace!
So thatãs the reason some of my frames wouldnãt take the Krylon spray paint! {Got to get some primer} Awesome tutorial!
Ashley @ 3littlegreenwoods recently posted…FinallyãÎ A Southern Snow Day!
I know Ashley I have a good amount of old craft fails laying around my house before learning about the magic of primer!
Those frames are just too cute! When I first saw the photo, I didnãt realized you used the paper clips to hold the photos. That totally adds to the cuteness of these frames! Pinning for later inspiration.
Bonnie @ Our Secondhand House recently posted…DIY $3 Sunburst Mirror
Thanks Bonnie! I love the clips too, I have been using those on more and more projects lately instead of gluing things down. Makes for such an easy change out later! Thanks for stopping by, happy friday
So pretty! The colors are divine and I love the way you hung the pictures! Brilliant!!!
Thanks for linking with Twirl & Take a Bow!
Thanks Robin! I love your link party! Fav fav fav
I pretty much love everything about this post!! I love the color, the thrifted frames and even the pictures! Please come share it at our party! http://www.mycraftilyeverafter.com/2014/02/04/awesome-things-tuesday-12/
Ashley @ My Craftily Ever After recently posted…Awesome Things Tuesday - 12
Hi Ashley,
Thanks for the invite I linked up! I will link up again next week and then add it to my link parties page!
Congratulations! This post is featured over at Diana Rambles today and has been pinned in the Featured at Diana Rambles board at Pinterest, Tweeted, and Recommended on G+. Please grab a featured button off my sidebar or via the link under the features. Thanks for sharing this awesome idea!
Diana Rambles recently posted…Pin Me Linky Party 71
Thank you Diana! I have added you to my Feature list on my home page! Really appreciate you including my ombre frames today