If you are looking for a great gift for a baby or toddler you came to the right place! Most kids love looking at pictures of themselves and their family. My one year old Scarlett is vain and demands to see pictures of herself on my phone constantly. I’m not going to lie to you…. this DIY baby picture board book was not my usual easy breezy type of project. It took a good bit of time and patience so be prepared for that before you dive in. In other words, do not make this gift for a random co-worker you barely know, make this for a good friend or family member 😉 Or better yet, make this for your own child !

BIG TIP: Use a book with less pages. Mine was 30 total pages including cover and back which ended up being a little much. When you are picking a board book at the thrift store, or on amazon, look for something with 14 total pages or less. It took me a full day to do this project, working off and on. The most consuming part is the DRYING time! You have to dry each page individually open or the crease in the spine will stick together so I pretty much visited this project every 30 minutes all day long, doing a new page then walking away. I made this for my good friend’s son, who is sooooo sweet, so it was well worth it.
Materials Needed: Board book (from the thrift store or 6$ blank board book from Amazon. Modpodge, Foam paint brush, scissors, Pictures (I printed on to cardstock) and white acrylic paint (optional, see step #5 below for details).

1. Measure your board book and figure out the dimensions your pictures + captions need to be. Make our final picture + caption 1/4″ smaller then book page. So if your book is 6″x6″ then your picture including the caption should be 5 3/4″x5 3/4″.
2. Design your pictures and captions in the computer. If you do not already have a way you like to do this then please go to my Add Text to Pictures POST for instructions using power point or picmonkey.
3. Print out your pictures and captions onto light weight cardstock. I used 67lb cardstock from Amazon, it is 8$ for 250 sheets.
4. Cut out your pictures.
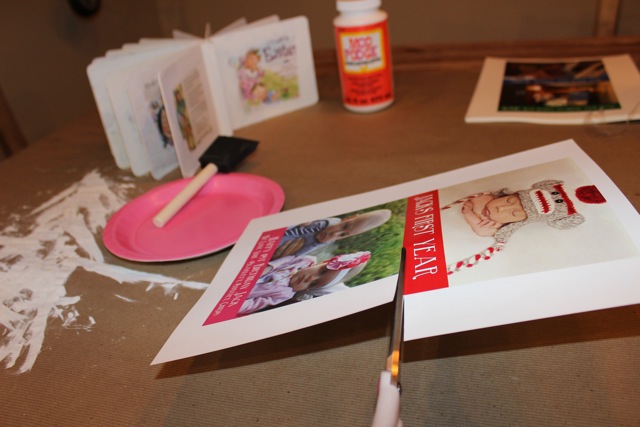
5. ** This step is optional. If you bought a thrift store board book and you would like your final board book to look clean then PAINT THE OUTER PORTION OF YOUR PAGES WHITE and fan out your book to let the paint dry. Make sure it is TOTALLY DRY, give this at least an hour and you might even need 2 coats.


3. While paint is drying pour yourself some wine and drink. I like this Chile Cabernet from Trader Joes 3.99$ it is amazing people. My other fave for 3.99 is in the Italy Section it is bright orange label GRIFONE PRIMITIVO. Aweeeeessssooome.

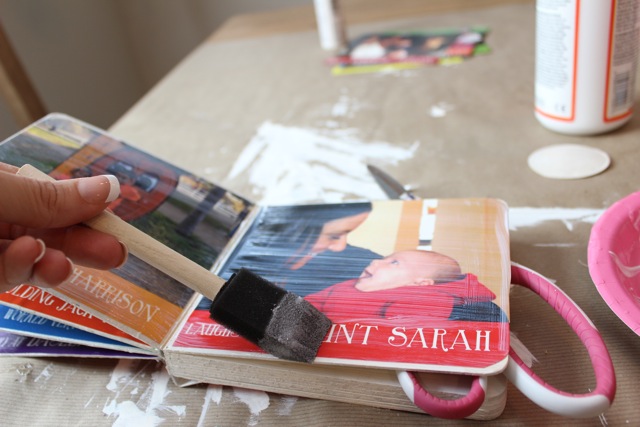
4. Layout the first page how you want it, cut the corners to be round if your board book is round… which most are. Then put on a thin layer of modpodge and place cardstock down. Make sure to smooth it down really good as air bubbles tend to pop up VERY EASILY. They don’t show up until later so just try to smooth everything down in the beginning. Let dry about 10min and place scissors or something to separate pages so no dripping or rub off occurs. Again… drink more wine. AND ONLY DO ONE set of PAGES at a time! Dont try to cheat, you will regret it, trust me I tried.


*** Tip *** I like to put my brush in a plastic bag while waiting for project to dry. This way the sponge or brush does not dry out.

5. Next smooth a layer of modpodge over the top of the picture and the edges so it fully covers the cardstock and make sure that the edges barely have any on them. Go over edges with a paper towel if you need to, this will save the pages from sticking together in the long run. Let this dry at least 15min. More wine drinking! I put scissors between the lower page and the rest of the pages while drying so they wouldn’t stick together.

6. Do the above process until all of your pages are finished. I had 30 total pages to do, so ummm it took me some time
7. When you are finished you might run into these issues: The pages will still be slight tacky and the book will not lay flat. The book was easy to get to lay flat, I just put tissues in between the pages, closed it and put hand weights on top after one night it was flat and fine. For the tackiness of the pages- THIS WILL NOT HAPPEN IF YOU MODPODGE EXTRA THIN AND WIPE EDGES. But if you are like me and went too thick with the modpodge then you can spray on clear gloss over the pages and AGAIN let them dry. I also added duck tape to the outer spine because I was worried the book would fall apart since the one I got from thrift store was pretty old. I have bought this mustache duck tape on Amazon (where else? I love amazon) for 6$ and have used it on many different projects so far.

Soooooo…. as you can see this book requires some computer skills, some patience and some wine, but I think it was worth it in the end! I will be making one for my daughter Scarlett for Christmas and putting on the modpodge very thin this time 🙂 Here are a few pictures of how it turned out


I also wanted to add a quick blurb about the way I wrapped this birthday gift. I decided to recycle the kraft paper and use as wrapping paper! I took the paper and turned it over onto the better non glue covered side, then I splattered some acrylic paint that I had in my craft drawer and voila, wrapping paper! I spruced it up a bit with some gift tags I designed. To download these click the link Happy Birthday Gift Tags and scroll through the pages for various colors.


I hope you enjoyed this post! For another fabulous baby gift idea visit my post pretend makeup for kids, trust me… best gift ever. My little girls LOVES her pretend play makeup. If you would like to receive my weekly newsletter sent out every Friday morning, filled with DIY tutorials for the home, the family and holidays please subscribe below
Thanks for stopping by my blog! Check out my New Etsy Print Shop as well.


Loving this idea!! What a great gift for someone and I think the wrapping paper really finishes it off! I have a ton of books like this to do something with.
Thanks Courtney! My friend’s son LOVED it which is great. Im excited to make one for Scarlett. Trying to work that into my craft plans next week
What a great idea! I have seen places online where you can have photo board books made but never thought to DIY one using a thrifted board book! I’ve made my son an ABC photo book which he loves but it has paper pages so he can’t look at it himself. May just have to try this idea soon.
Thanks Carrie! Yes the upcycled Board book from the thrift store is great for younger kids! I think this book would be great if it utilized story telling or alphabet as well.
this DIY board book looks very great, i also want to make one for my son…..
Thanks James, I bet your son would love his own book!! Hope all is well over at Wheat, miss you lots 🙂
This is one of my favorite baby projects ever! What a perfect gift for a 1 yr birthday!!!
Thank you bunches for linking up with Twirl & Take a Bow!
Thank you Robin! I can’t wait to link up more projects next week, your Twirl and Take a Bow link party is great. Just realized I need to add the button to my post, doing it now 🙂
LOVE this board book! What a clever way to document your childs first year! Way less inexpensive than scrapbooking ( although I do love to do that too! ) Love the wrapping paper too!
Thanks Katie!!
$3.99??? I knew we needed a Trader Joe’s before, but now I may need to call the city and see if we can offer some incentives for them to build one 🙂 And I love using an existing board book for this project - so cute.
Haha… Melissa I want to do a blog post that is titled “Best Trader Joes wines for under 5.99!” I have a bunch in mind but my friend who works there needs to weigh in her ideas before I post it lol. Glad you like the book
This idea is absolutely darling and the perfect gift! I’m featuring it in the morning on OneKriegerChick from the Hit Me With Your Best Shot Link Party. Thanks for linking up and hope to see you again this Tuesday at 7!
Happy Day!
~Ariean http://onekriegerchick.com/
That is AWESOME!! Thank you so much Ariean, I’m honored and LOVE LOVE LOVE the new link party!
I absolutely love this board book! My best friend will be having a baby this year so I will totally be making this for her! Thanks so much for sharing this!
Yay Carrie! I am so glad, thanks for stopping by and I hope your book turns out amazing!
That is so cute! I love it. I would love to do something like this for my son.
Lindsey you should, he would love it! My friend tells me that her son loves his book so much.
OMG!!! I feel like a thirteen year old using that abbreviation but this is seriously exactly what I’ve been looking for! I have a great nephew turning one next month and my first grandson about to make an appearance, this is perfect. Just one thing, the link to the picmonkey part says page not found when I try it.
Also, I’m so glad I found someone else who agrees that wine should be part of all craft projects!
Haha Carol, I use OMG all the time, we are both thirteen. So glad you like this and cant wait to see what you do please email me your project when you are done! And remember to put the mod podge on extra extra thin 🙂 Thanks for letting me know about the link I just went and fixed it, so glad you let me know! Here it is http://www.sohosonnet.com/crafts-and-diy/diy-holiday/how-to-add-text-to-pictures/
Thanks very much for putting this tutorial up! My grandson will be 1 year old in May and I can’t wait to do one of these for him!
Thank you for these steps…I’ve never Modpodged but have been thinking I would cover a board book with pictures of our family for my two little ones, I just wasn’t sure how to go about it, or if it would even work as I figured it couldn’t work unless you did every page separately…and turns out you do…darn it. I am going to tackle it his weekend. LOVE the very important wine steps.
Thank you!
I hope you do it Alison, the kids will LOVE IT! Biggest tip… Thin thin thin mod podge. I just did a few new mod podge crafts and put the mod podge on soooo thin, then layered on thin layers on top.. worked SO MUCH better.
LESLIE says
IM A CLUELESS CRAFTER. LOL. I AM TRYING TO CREATE ONE OF THESE FABULOUS BOARD BOOKS FOR MY BABYS FIRST BIRTHDAY USING POWERPOINT. THE BOARD BOOK I AM USING IS 6 INCHES TALL AND 4.75 WIDE. WHEN I INSERT MY PICTURES AND CROP THEM THE DIMENSIONS KEEP CHANGING AND MOST OF MY PICTURE GETS CROPPED OFF. LIKE WHEN I CROP THE HEIGHT ,THE WIDTH AUTOMATICALLY CHANGES AND VICEVERSA. ANY SUGGESTIONS? THANKS!!
This DIY made my morning. Thanks for sharing. Trader
Joe’s, here I come. Making a special book for some special tiny hands.
Thank you, thank you.
Very clever! I was wishing Shutterfly would do board books, but found Pintsized Productions do.
My only concern with your project is whether the modge podge and other materials are safe for little teething ones?
Hi Elaine,
I don’t think this book is good to allow for teething little ones. It is best to read during bedtime or read with your child to make sure they are not chewing on it. Good point, thanks for commenting Elaine!
creative_mum says
Wonderful idea for baby photo books! I’m definitely going to make a traditional album, but maybe I’ll also give photo books like this a chance 🙂
Firdauz Rusdy Santary says
that was a great idea! its seems so cute.. well, i think i would make this someday but not this day because a full of homework
Firdauz Rusdy Santary recently posted…Mengapa ngeblog?
nurul says
loved it !!!
so cute and creative..
Melissa says
Do I have to print the pictures onto card stock? Or can I just use the actual prints?
Referring to the diy baby board book
Katie C says
What a a wonderful gift! I bet he reads it everyday. I am going to make one ASAP!